Monday, August 31, 2020

DIY Flute Mask

 Flute Mask

By Bridgette Wood


If your student is eager to return to playing their instrument (what band kid isn't?) you might find your band director asking for them to have a modified face mask that they can wear while playing said instrument. Some instruments are pretty easy, the kids just cut slits in basic masks and can put their mouthpiece through the slit, but others pose specific challenges, especially the flute. Based off of a mask pattern created by Kerry Seip, a teacher in Colorado, I've adapted and created an easy to sew mask that will take less than an hour to make once you've gathered your supplies.


Supplies:

  • Sewing supplies (sewing machine, thread, scissors, ruler, pins)

  • Pen, chalk, marker … something to mark on the fabric

  • Pipe cleaner (4 inches)

  • Elastic for ear hoops or other choice for comfort. I used adjustable earloop bands that I found on Amazon.

  • XX-large men’s t-shirt or larger with No Side Seams. You can also use 1/2 yard jersey knit fabric but it was easier and cheaper for me to use a t-shirt. By using a t-shirt or jersey knit instead of normal cotton fabric from the fabric store there is less sewing and the mask has a little more flex to allow for the neckjoint to move under the mask.

  • Paper to make a pattern, gift wrap tissue paper works

  • Sew in velcro (5 inches of ¾ inch width or a comparable amount if you have something different on hand.


Because the mask is made of jersey knit you will need to use the zig zag stitch on your machine for nearly all of the stitches. It is also a best practice to use a ball point needle when working with jersey knit but definitely not necessary for this project. 


Directions:


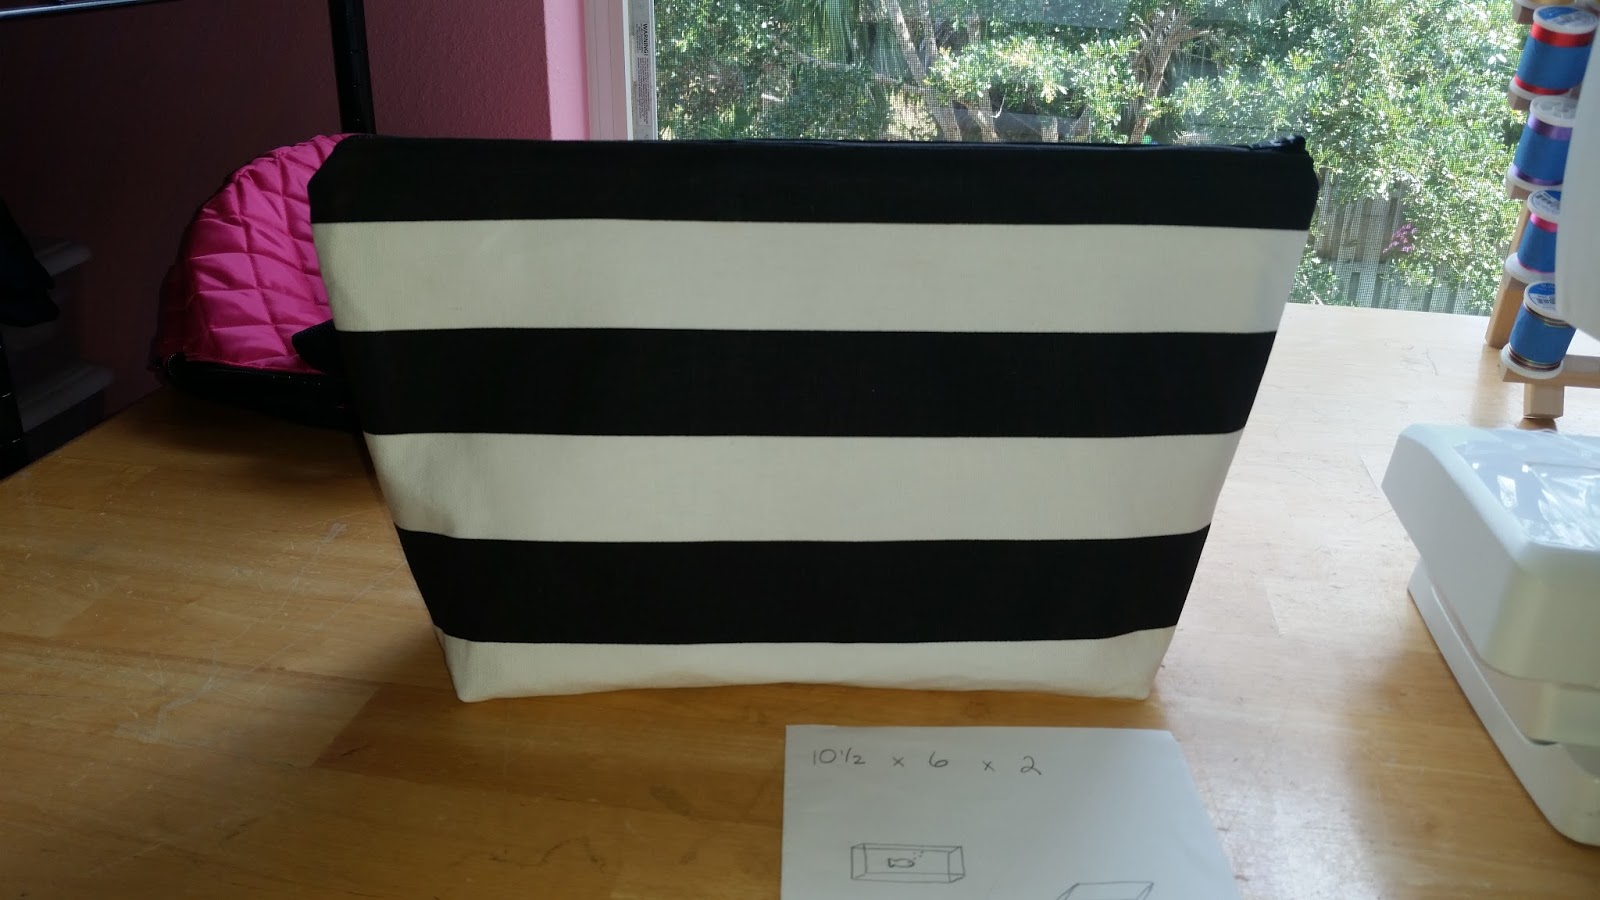
  1. Create a pattern using the measurements in the pic. Tissue paper works. For the rounded section in the top draw a rounded edge for the interior corner. No need for perfection. Just round the corner.


  1. Prepare the t-shirt for the pattern. Cut the sleeves and neck off of the t-shirt then cut one side seam open. ONLY CUT ONE SIDE SEAM OPEN so you have the largest continuous piece of fabric possible. I was able to get two masks out of one shirt with a little maneuvering. Fold the fabric in half so you can place the pattern along the fold. This may be bottom to top or left to right. Whatever works for the available fabric you have. It’s even okay if you have to fold it a little diagonal to make the most use of the fabric. This is how I was able to get two masks from one shirt.


  1. If you are using a solid t-shirt there is no right or wrong side for now. If your t-shirt has a pattern printed on it make sure to put the wrong sides together (right sides showing). Be sure the long edge of the pattern is on the fold of the fabric. Pin your pattern in place and cut.


  1. Using a zig zag stitch sew the short side opposite of the fold. No seam allowance required. Sew as close to the edge as you are comfortable. This is the back neck seam of the mask.


  1. Now that you have sewn the back neck seam open the mask so that you are working with the top. This is the side opposite of the point. Using chalk or a fabric marker mark the center of the top section. Also mark two inches on each side of the center. This is where the pipe cleaner will go. Now fold over the top edge ½ inch and pin. Sew down using a zig zag stitch across the entire top edge. If you feel comfortable insert the pipe cleaner along the way. If not, you can feed it in after you sew the casing.


  1. If you didn’t insert the pipe cleaner as you sewed the seam go ahead and feed it through. Move the pipe cleaner so it is centered between the lines that you marked in the previous step. Stitch over those lines to close off the casing to keep the pipe cleaner from shifting.


  1. Next you will add your ear pieces. You can use elastic, t-shirt strips, ribbon, whatever you choose. I would start with around 5.5” strips but expect to have to go back and adjust to fit. I found it easiest to use pre-purchased adjustable ear loop bands since I wouldn’t be able to custom fit each mask. Attach one side to the top seam and another about 2.5” down the rounded corner. 


  1. Next you will create a bit of “lift” to the nose area to allow a little extra room at the mouthpiece of the instrument. Lay the mask flat facing up and mark 1.5 inches down from the nose piece seam on the right side of the fabric.


  1. Bring the line that you marked up to the seam of the pipe cleaner casing creating a fold. Pin and sew along just the pipe cleaner seam only, not the entire top. Just the center 4 inches if that is easier to understand.


  1. Lay the mask flat facing up. Follow the image below for marking the line that you will cut next. This will allow the student to easily insert/remove their flute without having to repeatedly take off their mask or disconnect the headjoint of their flute. Once you have the line marked cut it open.


  1. Cut a 5” strip of velcro. Now cut that in half length wise making two sets of long skinny velcro. You will only need one set. Using a straight stitch sew your velcro to each side of the slit you just cut. 


You did it! You made a flute mask! If you find any cheats or have any feedback to share please leave a comment.


Special thanks to my percussion playing guinea pig who tried on a lot of prototype flute masks along the way.


Good luck to everyone trying to find a way to have band class and let the kids play.


Thursday, May 19, 2016

Is a Refrigerator Really Necessary? Plus a Sneak Peek of My Next Sewing Project

I have a dilemma that, according to my husband, I have spent a lot of calories worrying about. (Someone please tell my waistline that.) We need a new fridge. Not exactly "need" as in immediately, but not just "want" either since ours is on the fritz and paying for a repairman to come and diagnose a fridge whose history we know nothing about (it came with the house) isn't exactly my idea of a fun way to spend a few hundred dollars. And since there are very few same day delivery options when it comes to refrigerators waiting for ours to die isn't exactly a stress free option either. So, we've been looking at fridges. Like, every. single. time. we go to the home improvement store we have to stop by and open a few doors and make sure that we still want and agree on the same thing. And now we have possible space issues that have more to do with an island that can't be moved because the flooring wasn't continued underneath and the tile is discontinued and ... it just goes on and on. But, I think I have it all figured out.

Coolers! 

Seriously, giant coolers like we haul snacks to softball and soccer games in. I mean we already own two. Can't we just get a few more? It would definitely be cheaper than a new fridge. Every family member can have their own cooler. We'll keep a spare on hand for company. The big girls can take theirs back and forth to college. I'll even monogram them with some sweet southern font in their school colors. Think of the space this could save. And time! Oh, the time. We could just take our coolers straight to the grocery store with us and load the cold groceries right into them, wheel those puppies in the house and there, the groceries are already put away. How easy is that? Plus, I would gain a lot of closet space because I wouldn't have to store the coolers for a time of need. They would all stack where the fridge currently is. It's genius if you ask me. I see no flaws. Coolers it is!

Sadly, my husband doesn't want to play along so we continue to consider our refrigerator options. Talk about letting the wind out of my sails. I'm telling you, if we're ever divorced (which we won't be because he's stuck with me), he's getting the fridge. I'm going to coolers.

When I'm not coveting fancy fridges I do have a project in the works at my middle daughter's request. She has a bag full of art supplies that she totes around with her. There are pencils, sharpeners, charcoal, exacto knives, erasers, and well, lots of other things in her pathetic beaten up gallon sized ziploc bag. She told me a while ago that she could use something different so I'm trying a few things out. I'm using a new item for me, iron on vinyl, and working out a pattern for a zippered bag with a lined interior for easy clean up for her.


*Sad art supply bag.


Here are my notes so far. I know what dimensions she wants and made some calculations. I can tell you with great confidence that the calculations were wrong. I made a sample that didn't yield the right dimensions but I know what I did. Don't you love the fish tank sketch? I was drawing a three dimensional bag and ended up with a fish tank the first time around so I put a fish inside. I also have a few notes that I made along the way while I was sewing the first bag.
Here's the prototype. It will be great for something, but not what I intended. I'm not happy with the zipper and the measurements didn't work, at least not for my end goal. I do think this would be great in a beach bag for wet clothes and swimsuits so it won't go to waste.
That's my girl hanging out in my craft room, sketching and rocking her Monica Geller turtle neck. "Mom, the 90's are coming back," she says. Heaven help us.


Check back soon for the finished tutorial and maybe a glance at a few coolers at work.


Be sure to follow me on Pinterest, as well as Facebook, and find my applique designs at Applique Time


Regards,
Bridgette


Monday, May 16, 2016

I Made it Monday: The Easy Way to Sew Scout Badges

I Made it Monday

Join me on my ongoing quest to share tips, tricks, projects, and recipes along with just about anything else on I Made it Monday.

*This post may contain affiliate links. That means, at no cost to you, I may receive a small percentage if you make a purchase using the link. For my full disclosure statement please click here.


The Easy Way to Sew Scout Badges

Like her sisters before her, my youngest daughter is a Girl Scout. That means projects, cookies (yum, cookies), meetings, snack time, field trips, camp, and badges. Lots of badges. Some are iron on and some are not. Those that are don't always impress me with the adhesive that is on the badge so I don't even bother. I mean, I have several sewing machines, and I spend time at one of them almost every day so I sew those little puppies on. If you have a Scout and you've tried to sew badges you're probably tired of changing thread colors and lining things up. Here are a few tricks I've learned over the years. 

1. Clear thread. That's right. Don't bother changing your thread for every. single. patch. Just use clear thread and move from one patch to the next. I typically have white thread in my bobbin so that's what I use. I guess I could switch out my bobbin to the color of the vest but I don't. For clear thread I use Coats Transparent Polyester Thread.


2. Before you start sewing lay out your badges on the vest, then trace the outline of where you want them to go with a disappearing marker. I use a Pilot Frixion pen. It erases with heat so a quick press of the iron or tumble in the dryer and the ink is gone. Only one time did it not disappear for me and that was on a canvas bag so be sure to test it first. The price on Amazon is way better than the $5 I paid for just one pen at the quilt shop.


The ink disappears with heat so a quick press of the iron and it's gone.  

3. Sew the badges on. I typically start somewhere on the edge, make a straight line through the badge, then work around the perimeter. Clear thread is forgiving. It really is the secret to success.


The bobbin shows how I start across the middle then sew the perimeter. I also move from one patch to the next when they are placed adjacent to one another without lifting the presser foot.

There you have it. An easy, faster way to sew patches and badges. Be sure to share any tips or tricks you have in the comments and don't forget to follow me on Pinterest, as well as Facebook, and find my designs at Applique Time. Check back next week to see my next I Made it Monday post. 


Regards,
Bridgette

Monday, May 9, 2016

I Made it Monday Blueberry Cream Cheese Pound Cake

I Made it Monday

Join me on my ongoing quest to share tips, tricks, projects, and recipes along with just about anything else on I Made it Monday.

*This post may contain affiliate links, which means I receive a small percentage if you make a purchase using the link. For my full disclosure statement please click here.


Blueberry Cream Cheese Pound Cake

Last week I was asked to send in a dessert to be shared at a luncheon for Teacher's Appreciation week. I wanted to make something other than the usual fare of cookies, brownies, or cupcakes, so I decided to make Blueberry Cream Cheese Pound Cake. I originally got this recipe from Allrecipes.com at least 11 years ago and I've made it many times since then. I like to send it in for events to serve as a dessert or as a breakfast treat like it is regularly served in my house. Yes, I let my kids eat cake for breakfast. Blueberry cake. It's fruit, it counts. 


Ingredients
      1 package yellow cake mix (18.25 oz)
   1/4 cup white sugar
      3 eggs
      1 package cream cheese (8 oz) room temperature
   1/2 cup vegetable oil
      1 tsp vanilla extract
1 1/4 cups blueberries (I've used fresh and frozen)

1. Preheat oven to 325° F. 
2. Grease and flour a 10 inch Bundt pan.
3. In a large bowl, stir together the dry cake mix and sugar. Make a well in the center and pour in the eggs, softened cream cheese, oil, and vanilla. Beat on low speed until blended. Scrape the bowl and beat 4 minutes on medium speed. The mixture will be very thick. Fold in the blueberries and pour the batter into the prepared pan.
4. Bake in the preheated oven for 40 to 45 minutes, or until a toothpick inserted into the center of the cake comes out clean. Let cool in pan then turn out onto a cooling rack to cool completely.

A few notes ...

It almost always takes another 5 - 10 minutes in my current oven and took another 15 in my last oven. Don't be afraid if the toothpick doesn't come out clean right away.

It is a very thick mixture. If you added the correct amounts of eggs, oil, cream cheese, and vanilla you're good. I was worried that I missed a liquid ingredient the first few times I made it but I didn't. It's just that thick.

To prevent the blueberries from sinking you can coat them lightly with flour before folding them into the batter.

Don't be afraid to use extra blueberries. I have used up to a full pint and never felt that it was too much. Don't be afraid to use frozen blueberries either. 


My middle daughter helped take pics for this blog post. This is picture number twenty-two of this slice of cake. 22! Food is not photogenic people. We added the extra blueberries and a sprinkle of powdered sugar to enhance the image.
This is picture #1. Poor little piece of cake. Thank goodness for digital cameras. Can you imagine waiting for the film to be developed and seeing this?! Did I just give away my age?

Who will you make this cake for? Have any suggestions or ideas for making it better? Be sure to share in the comments and don't forget to follow me on Pinterest, as well as Facebook, and find my designs at Applique Time. Check back next week to see my next I Made it Monday post. 


Regards,

Bridgette 

Monday, May 2, 2016

I Made it Monday Easy Key Fobs Tutorial

I Made it Monday

Join me on my ongoing quest to share tips, tricks, projects, and recipes along with just about anything else on I Made it Monday.

*This post may contain affiliate links, which means I receive a small percentage if you make a purchase using the link. For my full disclosure statement please click here.

Easy to Sew Key Fobs


A while ago my mini me asked me to make her a key fob. We talked about what she wanted, measured a few scraps to her wrist to determine length, gathered the hardware and then ... nothing. All of the notes and ideas sat on a table in my craft room and waited. Like lots of other ideas, it got pushed to the back burner. Last week I finally sat down to work on it and here's what I came up with ...

Materials

  • 1/4 yard of fabric (fat quarters work fine)
  • Basic sewing supplies: machine, needle, thread, scissors, iron, ruler, you know, the basic stuff.
  • Fusible interfacing. I used fusible fleece for some and lightweight fusible interfacing for others. The thicker your stabilizer the stiffer your key fob. It is really a matter of preference and what you have on hand.
  • Key fob hardware. I used 1.25" hardware. You can find it at craft stores like Michael's and Joann or online in a variety of places. I bought mine from Amazon
  • Pliers to attach hardware and some kind of scrap fabric to prevent scratches.
After you have gathered your supplies your nearly halfway there. Seriously. These are super quick and easy. Not only did I make one at my daughter's request but I made extras for Teacher Appreciation Week, thank you gifts for Girl Scout troop leaders, Mother's Day gifts for my Mom and Gramma who love to get home made gifts, and I'm even planning to make some in school colors for my middle daughter's friends for their senior trip coming up next month. Cute, quick, easy. What more could you ask for?

Step 1.
Cut your fabric 10 1/2" x 5".


Step 2.
Cut your fusible interfacing 10 1/2" x 5". If you choose to go with a thicker fusible product like fusible fleece cut it 10 1/2" x 1 1/4". If you're unsure which you want to use keep reading. I made a few notes about my preference towards the bottom.

I cut a few different types of interfacing so I could test them. The left is standard lightweight fusible interfacing. The center is a fusible fleece cut to measure the entire fabric. The right is a quarter strip of fusible fleece.

Step 3. 
This step varies if you're using fusible interfacing or fusible fleece.

*If you're using lightweight fusible interfacing*
Iron the fusible interfacing to the fabric according to the directions. Once it is adhered, fold your fabric in half long ways, wrong sides together, and iron. 

With lightweight interfacing attached.
Fold in half long ways and iron.

Next, open the fabric and fold the sides in to the center crease creating a quarter fold. Iron again.


Then, fold the two halves together on the original crease and press.


*If you're using fusible fleece*
Fold your fabric in half long ways, wrong sides together, and iron.

Next, open the fabric and fold the sides in to the center crease creating a quarter fold. Iron again.

Then, tuck the strip of fusible fleece inside one of the folds you created by folding in to the center. Be sure to tuck the strip in as close as possible to the fold. Attach the fusible fleece according to the directions. 


Then, fold the two halves together on the original crease and press.

Step 4.
Sew a few straight lines. Top stitch the long sides about 1/4" from the edge. I prefer to sew the creased side first then the side with the two folds together. I find that it helps prevent any possible shifting.

I prefer to use the red notch on my foot as a guide.

Step 5. 
Attach the hardware. To prevent scratches on your hardware you'll want to put something between the hardware and your pliers. I actually use a scrap of fabric that also serves as my pressing cloth. Fold the key fob strip in half so that the raw edges are together and place them between the "teeth" in the hardware. I prefer to hold it in my hand sandwiched in between my scrap of fabric. That way I can see the sides and be sure that it isn't shifting and still clamp it closed. If you're having problems with shifting you can also pin the sides together to prevent any shifting while you clamp it. This was by far the hardest step, especially trying to photograph it, but once I found what worked for me it was easy to clamp them all in just a few minutes. After you have clamped it shut the last thing to do is attach the key ring.


It's very hard to take a picture of something that already requires two hands. Just imagine my other hand holding the pliers.

* A note about stabilizer*
I had several types of stabilizer on hand so I tried a few different kinds, standard lightweight fusible interfacing like what is used in collars on clothing, fusible fleece (Pellon 987F), and Peltex Ultra Firm Stabilizer (Pellon 72F). In the end I felt the Peltex Ultra Firm was too firm. The fusible fleece is great if you want a little more stability but only when it is used as a small strip. I tried it covering the entire rectangle of fabric and it seemed to thick. The standard lightweight fusible interfacing was the easiest to work with in my opinion and provided a similar result to the strip of fusible fleece. My only concern is that it may not wear as well the fusible fleece and may soon be limp and lifeless. In the end I prefer the strip of fusible fleece. 

* A note about hardware*
If you bought 1" hardware you'll need to cut your fabric 10 1/2" by 4" and cut your fusible interfacing the same for lightweight or 10 1/2" by 1" for fusible fleece.


Who will you make a cute key fob for?

Be sure to follow me on Pinterest, as well as Facebook, and find my designs at Applique Time. Check back next week to see my next I Made it Monday post. 

Regards,

Bridgette 

Monday, April 18, 2016

I Made it Monday How to Make a Cleaning Schedule that Works for You

I Made it Monday

Join me on my ongoing quest to share tips, tricks, projects, and recipes along with just about anything else on I Made it Monday.

*This post may contain affiliate links, which means I receive a small percentage if you make a purchase using the link. For my full disclosure statement please click here.


How to Make a Cleaning Schedule that Works for You

*** Author's note *** This post was very difficult for me to write. Not that I couldn't get the basic concept of a cleaning schedule down but to convey that you have to do what is right for you and your needs. Don't be intimidated. My schedule is that of a stay at home Mom with two grown children and a 9 year old. My needs are different. Take suggestions and samples but make something that works for you. And don't worry, it doesn't have to be as pretty as some that you've seen online, or cute, or neat, or comprehensive. Find what works for you, not someone else. This is definitely one of the categories where something is better than nothing.***

I know you've seen them on Pinterest. Beautiful checklists of cleaning schedules and routines and tips and tricks all aimed to help you find a rhythm and keep your house spotless. Well, I've got something to tell you. They. Don't. Work. Not that they don't work at all, but not for you. Here's why. Those schedules were all made for someone else. Their home, their children, their work schedules, them and just them. No one else. But you really need a schedule to help you stay on track you say? Yeah, me too. So I made my own and you can also.

Before we go on ... I don't know about you, but the cute graphics and bright colors on some of the printable checklists online do nothing to motivate me to clean a toilet. It doesn't matter what shape you put next to it for me to put a check mark in, I'm just not going to be excited about the job. If you need cute graphics and rainbow colored check boxes this may not work for you either. Just wanted you to know.

Several years ago I had a revelation. Although many of the families living around me had some type of home cleaning service, they generally only came once every two weeks. This meant the toilets and bathtubs and anything else of my neighbors was only being cleaned once every two weeks. If they could get by on a two week schedule why couldn't I? It's not that I was cleaning everything weekly, or even biweekly, but as a stay at home Mom the pressure was there, even if it was only in my head. When I actually started to break things down to a biweekly schedule it all seemed plausible. I didn't have to clean everything on the same day, but if I could say that it had been cleaned in the last two weeks, well, that was good enough for me. And if I had a bad day and missed something, that was okay too, because it would come back around in two short weeks. 

Here's how I did it.

First, I made a list of each presumed weekly chore in my house.

  • Bathrooms
  • Dusting
  • Vacuuming
  • Kitchen
  • You get the idea.


Next, I made a list of things that I considered maintenance. These are things that don't have to be done regularly but it helps to do them occasionally during the year.

  • Oven
  • Dust hanging picture frames
  • Vacuum/sweep under furniture
  • Clean out dryer vent

Then, I sat down with a piece of paper and thought about my family's schedule. Which days were busier than others? Some days we had after school commitments. Some days I volunteered at the school for 3 or 4 hours at a time. Some days there just wasn't a moment to spare with all of the homework and driving around, others there was enough flex that I could actually think about accomplishing more than just running the dishwasher.

I divided the chores among a two week schedule breaking up large tasks, like cleaning everything in the bathroom except the bathtubs one week, and just the bathtubs the next, or cleaning the upstairs floors one day and the downstairs floors another. It didn't have to all be done at once, just once every two weeks. When I was finished with the presumed weekly chores I moved on to monthly maintenance chores dividing them among the months of the year, taking into consideration our families likely activities and the weather. For example, cleaning the oven was scheduled for January since running the super hot cleaning cycle on the oven would help warm the house not over heat it like it would in July or August. And August didn't get any big tasks because back to school time is hectic enough. Here's my recently revised schedule for our new house.


Click the here to download a PDF version. An excel link is located at the bottom of the post.


This is where I want you to stop for a moment and not focus on the schedule as it is written. This is my schedule. It works for me. It's not yours. In order for this to work you're going to have to make your own schedule, or at the very least, tweak mine some. My schedule is really meant to be a guide. 

Some things to know. My kids are older. I don't have little ones crawling or playing on the floor all day so floors are not a high priority. If you have little ones you'll probably want to clean the floors more often, at least in some rooms, so your schedule will be different. I am a bit of a neat freak when it comes to the kitchen. I want the counters cleaned, the appliances sparkling and the dishes in place. If a more "lived in" kitchen is your style then you have a little extra flex. And believe me, sometimes I really wish I could be okay with that too. My laundry demands may be less than yours as well. I don't wash my middle daughter's clothes (she's 18 and does her own laundry), I have a daughter away at college so I don't do hers either, and we live in central Florida now so we're rarely wearing much more than shorts and t-shirts. 

Don't do more work than you have to. I have cleaning products and paper towels under the sink in every bathroom so I don't have to gather my supplies when it's time to clean. This also helps for little clean ups in between. When I had little kids I kept them nearby on a high shelf in the linen closet. Also, I don't use a lot of different products. Pine-sol mixed with water to make pine cleaner works great on counters, straight Pine-sol in the toilet, glass cleaner for the mirror and a Mr.Clean Magic Eraser Bath Scrubber for the tub are all I need for the bathrooms. I even use Pine-sol and water to mop. Other than my laundry supplies I don't use much else for cleaning.

If you're looking at my schedule you might notice that the more straightforward things, like making the bed or emptying the dishwasher, aren't there. My schedule was never meant to be a daily checklist for me but more of a guide. Making the bed, general tidying, and emptying the dishwasher are things that happen no matter what's on the list. I iron almost every day, too.

I also understand that a few things on my list might take a little explaining.

Laundry - No, I don't do all of my laundry on Monday. I do however make a plan. Not a written plan, and certainly not a non-flexible plan, but a plan. If I know that we have 3 softball games like this week I try to anticipate the laundry so I can wash my daughter's softball uniform with a full load of laundry and not find myself needing to wash it alone. I try to wash at least 1 load each day during the week. I find that if I start more than 1 load then that's all that I do, start it, but not finish it. If I do 1 load I am likely to wash, dry, fold and put it away. When it's not a sport season my laundry schedule typically looks something like this ...

Monday - Darks
Tuesday - Lights
Wednesday - Towels
Thursday - Bath and kitchen rugs (this is on the schedule).
Friday - Bed laundry (this is on the schedule).

If I need to do more, say there are lots of darks, I try to do another load on towel or rug days since those are easier loads and it's at least possible that I will complete the extra load and not leave it stalled in one stage or another of the laundry process.

And a little clarification on bed laundry. I rotate whose bed gets washed each week. Currently we have 3 beds being used in our house so we could go as much as 3 weeks between washings. Yes, I have extra sheets, but of course I prefer those that are on the beds, so I typically don't change them unless I am washing them and putting them back on. Go ahead. Judge me. If laundry is light one week I may pull another set and wash it, if not, I am perfectly fine going 3 weeks. I know someone, somewhere says that you should wash your sheets every week, but you should serve something besides hot dogs or cereal for dinner too. Priorities. If cleaning/changing your sheets is more important put it on your schedule more often.

Cook - I like to do my own pseudo version of monthly freezer cooking. I don't prepare everything for the month but I do buy in bulk and prepare in bulk. Some weeks I bake, then freeze a lot; muffins, apple bars, granola bars. Other weeks I prep and freeze for dinners; shredded chicken, browned ground beef, diced onions, meatloaf, ziti, hamburgers. Basically whatever I stocked up on while shopping gets prepped or cooked on Tuesday of week one.

Bathtubs - By accident we bought Mr.Clean Magic Erasers Bath Scrubbers. I admit, I was a little frustrated to begin with since I didn't mean to buy them, then I used one and it is 
a-maz-ing. I had been using dryer sheets to clean the soap scum in my shower. The Magic Eraser Bath Scrubber did the job in half the time with half the effort. They are worth their weight in gold. If you haven't tried them now is your chance.


Hope's room - My youngest daughter is a shover. She shoves everything in little cracks and crevices in her room. Books that go on the book shelf get shoved into stacks. Papers that go in her desk get shoved in the drawers. She picks up but she's just at that stage where if you let it get out of hand it takes an entire weekend and several trash bags to deal with. I prefer to spend a few minutes with her every other week dealing with some element of her room. This week could be her bookshelf, next time might be her nightstand. We don't "clean" her room, we just deal with a few things. If you have kids older than 4 you probably understand.

Cards - This really isn't a household chore but more of a social chore that just wasn't being handled well before I put it on the schedule. I make a list of the upcoming events that might require a greeting card. Mostly birthdays (that I was constantly missing before) but also things like Mother's Day, graduations, weddings, births, etc, and I go shopping for all of the cards that I will need for the next 6 months all at once. This has made this task a lot easier to keep up with. And if you're thinking why don't I just email cards I will tell you. To me, there is nothing like opening the mail box and finding a brightly colored envelope with a card inside. Emails get deleted. Snail mail cards are saved. I am all for cutting the clutter but I do like a nice greeting card.

Washer drain - I have a front load washer with a drain filter hidden on the front. According to the manufacturer this filter should be cleaned bi-monthly. It's really pretty easy and effective. I've found some strange things in the trap (think bobby pins and the like) that surely would have started to cause a problem over time. 

Paint Touchups - I prefer to deal with furniture scuffs and marks on the painted walls inside and outside of my house on a regular basis rather than ignoring them and letting them collectively diminish the appearance of my home. Sounds snooty. Makes me happy. That's all that matters.

Doorknobs and light switches - No, I don't clean them every month, but I do try to spray them with Lysol or some other disinfecting spray monthly, or even more often if a family member has been sick. In fact, if someone has been sick, I am likely to also spray the remote controls, backs of chairs, sink faucets, cabinet knobs, refrigerator handle, and really anywhere else germ ridden hands typically touch.

I think that's it. I hope that you can find inspiration to make a schedule that is right for you. If you have suggestions for how you've been able to make it all work please feel free to share in the comments.

For a PDF version of my schedule click on the image of my schedule. For an editable Excel version click here.


Be sure to follow me on Pinterest, as well as Facebook, and find my designs at Applique Time. Check back next week to see my next I Made it Monday post. 

Regards,


Bridgette